
| 일 | 월 | 화 | 수 | 목 | 금 | 토 |
|---|---|---|---|---|---|---|
| 1 | 2 | 3 | 4 | 5 | ||
| 6 | 7 | 8 | 9 | 10 | 11 | 12 |
| 13 | 14 | 15 | 16 | 17 | 18 | 19 |
| 20 | 21 | 22 | 23 | 24 | 25 | 26 |
| 27 | 28 | 29 | 30 |
- 글또10기x코드트리
- 상속
- app.post
- xlsx-js-style
- array
- code-push-standalone
- codepush
- 페이지네이션
- Filter
- extends
- supabase 페이지네이션
- javascript
- map
- interface
- async
- Next.js
- generic
- 타입스크립트
- meatadata
- 코드푸시
- supabase authentication
- 슬라이딩윈도우
- react
- 이진탐색
- supabase auth
- Spring
- set
- reactnative
- TS
- 스크롤이벤트
- Today
- Total
rhanziy
js - 선택한 이미지 미리보기 구현 본문
node.js로 프로젝트 생성중에 이미지를 업로드 하는 기능은 multer 미들웨어를 통해 구현했다.
이제 파일을 선택했을 때 preview를 만들어주고 싶었는데 서버단에서 계속 삽질함;;
걍 간단하게 자바스크립트의 FileReader() 객체로 화면단에서 구현가능했다.
html 코드
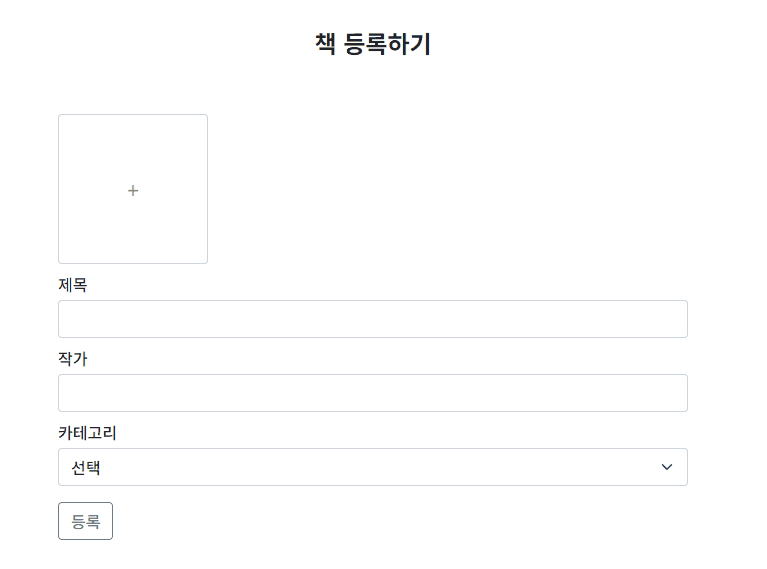
<div class="d-flex my-5 mx-auto justify-content-center" style="max-width:700px;">
        <form action="/upload" method="POST" enctype="multipart/form-data" style="width:90%;">
          <div id="img-preview" class="mt-2 d-flex">
            <input type="file" id="file" name="file" accept=".jpg, .jpeg, .png"  class="form-control mt-1" multiple>
            <label class="fileLabel" for="file"> + </label>
          </div>
          <div class="mt-2">
            <label>제목</label>
            <input type="text" name="title" class="form-control mt-1">
          </div>
          <div class="mt-2">
            <label>작가</label>
            <input type="text" name="author" class="form-control mt-1">
          </div>
          <div class="mt-2">
            <label>카테고리</label>
            <select name="cate" class="form-select mt-1" aria-label="Default select example">
              <option selected>선택</option>
              <option value="01">국내도서</option>
              <option value="02">외국도서</option>
            </select>
          </div>
          <button type="submit" class="btn btn-outline-secondary mt-3">등록</button>
        </form>
      </div>
🔽 css코드
input[type="file"] {
display: none;
}
.fileLabel {
display:block;
min-width: 150px;
height:150px;
margin-right: 5px;
color: #8d8d8d;
font-size:20px;
text-align: center;
line-height:150px;
border: 1px solid #ced4da;
border-radius: 0.25rem;
cursor: pointer;
user-select: none;
transition: 0.2s ease-in;
}
.fileLabel:hover {
background-color: #e2e2e2;;
}
#img-preview div {
width: 150px;
min-width: 150px;
height:150px;
margin: 0 5px;
border: 1px solid #ced4da;
border-radius: 0.25rem;
}
#img-preview div:last-child{
margin-right:0;
}
#del{
float: right;
width:30px;
height:30px;
margin:5px;
background: rgba(0, 0, 0, 0.5);
color:#fff;
border:none;
border-radius: 50%;
}
js코드
// input id="file"이 change될때 실행될 이벤트리스너.
$('#file').change(function(){

		//this.files에 선택한 파일객체가 담긴다
        const files = this.files;

		// 파일 업로드 개수 제한
        if(files.length > 3 || $('#img-preview div').length + files.length > 3) {
          alert('사진은 3장까지 업로드할 수 있습니다.');
          return false;
        }

        // 여러개 선택한 file들하나하나 for문 돌려서
        // reader가 onload되면! 경로가 담긴 result.result를 url이나 img src에 박아준다.
        for (i of files){
          let reader = new FileReader();
          reader.onload=()=>{
            $('#img-preview').append(`
              <div style="background : url(${reader.result}) no-repeat; background-size : cover">
                <button id="del" type="button">x</button>
              </div>
            `)
          }
          // reader에 file의 url를 담아줌.
          reader.readAsDataURL(i);
        }
      })
화면결과
다음은 동적으로 생성한 삭제버튼 기능 구현!
'Html_css_js' 카테고리의 다른 글
| 재귀함수 (0) | 2024.09.10 |
|---|---|
| js - jquery 동적으로 생성한 버튼 기능구현(delete) (0) | 2023.09.06 |
| TS - interface 쉽게 작성하기(json데이터) (0) | 2023.03.13 |
| TS - rest 파라미터, destructuring type지정 (0) | 2023.01.28 |
| TS - interface 로 type 키워드 구현 (0) | 2023.01.27 |

